Set AC Timer For Ease & Energy Efficiency

To keep a home’s temperature comfortable and cool in summer months or warm in winter months, we often just leave air conditioner units running. However, there is a better way of keeping your home comfortable, which involves setting a timer on your air conditioner. With air conditioner timer functions, you can set your unit to warm up your bedroom before your alarm goes off or to come on just before you get home from a long day at work.
While comfort is one consideration, another important benefit of using the timer on your air conditioner is reducing energy bills. By precisely controlling when your system runs, you can avoid peak energy times and reduce unnecessary usage. Let’s not forget about optimising your sleep either. You can use the sleep timer to gradually adjust temperature throughout the night, ensuring restful sleep without overworking your system. Learn how to put a timer on an air conditioner in this Fujitsu guide.
Take remote control of the timer on your aircon
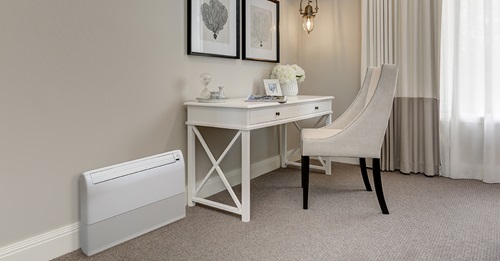
There are two ways to regulate your air conditioner unit’s temperatures when using timer functions with your Fujitsu remote control for Lifestyle wall mounted air conditioner and Compact floor air conditioning range .
Let’s first look at how to set up air conditioner timer on/off functions using your remote control.
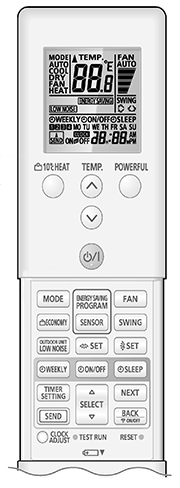 | Preparing your remote
Setting the weekly timer
|
4. Press the ‘NEXT’ button to set the start or stop time
Use the ‘SELECT UP or DOWN ARROW’ buttons to adjust the time.
5. If you are setting up a ‘ON timer’ press the ‘NEXT’ button again to set the temperature
Use the ‘SELECT UP or DOWN ARROW’ buttons to adjust the temperature.
6. Repeat steps two to six to set up to four different time periods for the day/week.
7. Once you’re satisfied with all settings, press the ‘SEND’ button to lock them in.
You’ll hear a beep to confirm the settings have been sent to the air conditioner.
The WEEKLY icon will be shown on the screen to indicate a weekly timer is active.
To deactivate the weekly timer, press ‘WEEKLY’ button to remove the icon from the screen.
Setting the ON timer
Press the ‘TIMER SETTING’ button. Press ‘SELECT UP or DOWN ARROW’ buttons until you see ‘ON’ flashing on the display. Press ‘NEXT’ button
Use the ‘SELECT UP or DOWN ARROW’ buttons to set the desired time for the air conditioner to turn on.
Once you’re satisfied with the settings, press the ‘SEND’ button to lock it in.
The ON icon will be shown on the screen to indicate an ON timer is active.
To deactivate the ON timer, press the ‘ON/OFF’ button to remove the icon from the screen.
Setting the OFF timer
Press the ‘TIMER SETTING’ button. Press ‘SELECT UP or DOWN ARROW’ buttons until you see ‘OFF’ flashing on the display. Press ‘NEXT’ button
Use the ‘SELECT UP or DOWN ARROW’ buttons to set the desired time for the air conditioner to turn off.
Once you’re satisfied with the settings, press the ‘SEND’ button to lock it in.
The OFF icon will be shown on the screen to indicate an OFF timer is active.
To deactivate the OFF timer, press the ‘ON/OFF’ button to remove the icon from the screen.
Setting the SLEEP timer
Press the ‘TIMER SETTING’ button. Press ‘SELECT UP or DOWN ARROW’ buttons until you see ‘SLEEP’ flashing on the display. Press ‘NEXT’
Use the ‘SELECT UP or DOWN ARROW’ buttons to set the desired duration (up to nine hours).
Once you’re satisfied with the settings, press the ‘SEND’ button to lock it in. The air conditioner will gradually adjust the temperature and turn off after the set time.
The SLEEP icon will be shown on the screen to indicate a SLEEP timer is active.
To deactivate the Sleep timer, press the ‘SLEEP’ button to remove the icon from the screen.
Using timer functions in myanywAiR® Next
The myanywAiR® Next app, paired with Fujitsu General’s anywAiR® technology, offers unparalleled control over your home environment. With myanywAiR® Next, you can control your system from anywhere, at any time. The user-friendly interface makes complex scheduling a breeze, so you don’t need to be a tech expert to master your home climate
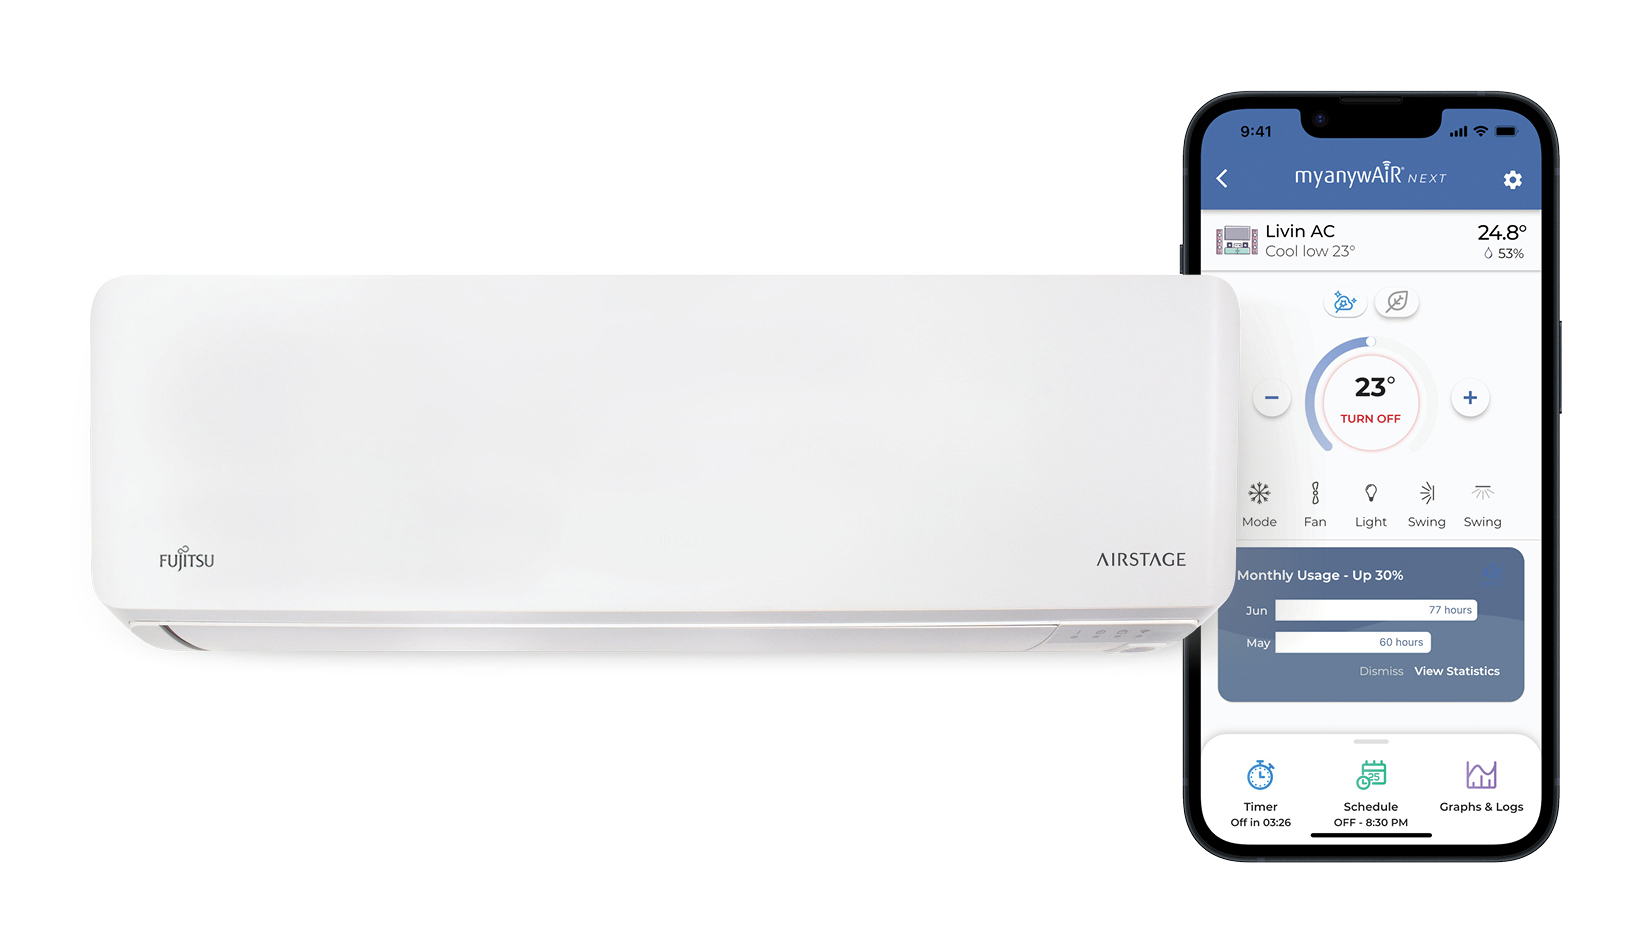
- Download and connect: Install the myanywAiR® Next app and connect it to your Fujitsu General air conditioner via the anywAiR® technology Wi-Fi adaptor II.
- Navigate to timers: Open the app and find the timer or scheduling section.
- Choose your timer type:
- On/Off timer: Set a one-time on or off event within the next 24 hours.
- Program timer: Create a sequence of on and off events.
- Weekly timer: Set up to four different times for each day of the week.
- Sleep timer: Gradually adjust temperature over time for optimal sleeping conditions.
- Set your desired times: Use the intuitive interface to select when you want your air conditioner to turn on or off.
- Adjust temperatures: For more advanced timers like the weekly schedule, you can set different target temperatures for each time slot.
- Activate and enjoy: Once you’ve set your timers, activate them with a simple tap. The app will confirm your settings.
Advanced features for climate control with myanywAiR® Next
The myanywAiR® Next app isn’t just about basic air conditioner timer settings. For those who want to take their climate control to the next level, there are some advanced features to explore. Try using geofencing to set your system to turn on automatically when you’re nearing home. You can also program temperature-based rules, instructing your air conditioner to kick in if the room temperature goes above or below certain thresholds. For the energy-conscious, the app also offers energy monitoring features so that you can keep track of your usage patterns and optimise your timers for maximum efficiency.
Getting started is easy
Getting started with myanywAiR® Next is simple. First, check if your Fujitsu General air conditioner is compatible with the anywAiR® technology Wi-Fi adaptor II. Next, have a licensed installer set up the adaptor, which is especially easy for Lifestyle range units. Once that’s done, download the myanywAiR® Next app from your device’s app store. Follow the in-app instructions to connect your air conditioner, and you’re ready to start exploring the world of intelligence
Technical support
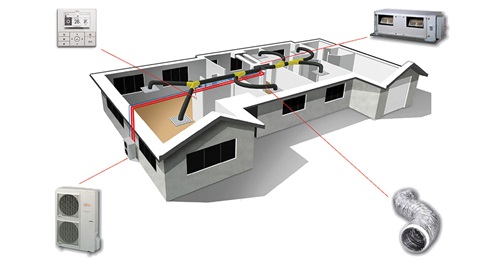
Fujitsu’s Help Centre can provide technical support across the range of home air conditioning products we sell. Whether it’s setting up an AC timer, or a query with one of our single room air conditioners, our knowledgeable staff can help resolve a range of issues relating to the functionality of our units. Our team can also assist with questions you may have about our newest range of smart ducted air conditioners.
Need additional support?
For further assistance on how to set air conditioner timers, call us directly to speak to a member of our friendly Fujitsu General Assist team on: 1300 364 484.
Helpful Articles
Helpful articles and tips on how to keep your home and office comfortable all year round.
.tmb-tmb420.jpg?sfvrsn=5c4be2e1_1)